Skoolie Upcycled Gym Floor and Subfloor Prep
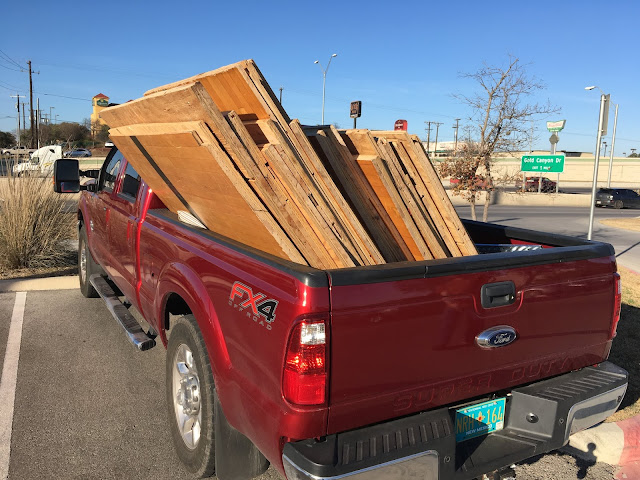
Not too long after my most recent post, I was able to acquire flooring for my bus. A guy in San Antonio was helping to clear out some water damaged gym flooring in the local area and had 16 slabs of the stuff in a storage unit.
I had to bring my buddy Alex along to help me load them out of the unit and into the back of a pickup truck that I had borrowed from another buddy. These sections were extremely heavy, but so well worth it to have a used maple floor at roughly $1.00 per square foot.
The biggest challenge with the flooring (physically and mentally) is removing it from the plywood backing. Each one takes about 30-45 minutes to completely strip down. This is particularly frustrating when I know that I'm going to have to go through and clean each board before installation... since they're covered in years of school dust and teen sweat. It's a bit more work, but well worth the savings and aesthetic.
My plans for the subfloor are fairly simple:
1. Directly on top of the sealed metal floor (see previous posts), I've already laid the foundation for my subfloor. It's 2" x 2" boards that are attached to the wall instead of the floor, as I didn't want to drill holes into my newly painted/sealed floor.
2. I will use approximately 1.5" of foamboard insulation. secured in place on the edges by a closed cell expanding foam. I'd rather not use glue, and as of now I see no need for it. Those panels are wedged firmly into place.
3. I'll add a layer of moisture barrier and noise insulation on top of the plywood, upon which the maple planks will sit.
4. 3/4" plywood is my planned base for the floor. The extra thickness will further reduce noise and control temperature better.
I'll nail the rest of the flooring in after that. I'm also probably going to go for more of a natural finish on the wood since I really don't care for the "yellow" color, but that's an entirely different post to come! Wish me luck!
 |
| 16 Large Sections. It was a lot of work... but beer helped. |
I had to bring my buddy Alex along to help me load them out of the unit and into the back of a pickup truck that I had borrowed from another buddy. These sections were extremely heavy, but so well worth it to have a used maple floor at roughly $1.00 per square foot.
The biggest challenge with the flooring (physically and mentally) is removing it from the plywood backing. Each one takes about 30-45 minutes to completely strip down. This is particularly frustrating when I know that I'm going to have to go through and clean each board before installation... since they're covered in years of school dust and teen sweat. It's a bit more work, but well worth the savings and aesthetic.
My plans for the subfloor are fairly simple:
1. Directly on top of the sealed metal floor (see previous posts), I've already laid the foundation for my subfloor. It's 2" x 2" boards that are attached to the wall instead of the floor, as I didn't want to drill holes into my newly painted/sealed floor.
2. I will use approximately 1.5" of foamboard insulation. secured in place on the edges by a closed cell expanding foam. I'd rather not use glue, and as of now I see no need for it. Those panels are wedged firmly into place.
3. I'll add a layer of moisture barrier and noise insulation on top of the plywood, upon which the maple planks will sit.
4. 3/4" plywood is my planned base for the floor. The extra thickness will further reduce noise and control temperature better.
I'll nail the rest of the flooring in after that. I'm also probably going to go for more of a natural finish on the wood since I really don't care for the "yellow" color, but that's an entirely different post to come! Wish me luck!
 |
| Maria helped me brew beer! (More like got in the way...) |


Comments
Post a Comment